What Home Office Cable Guides Won't Tell You About Wire Routing
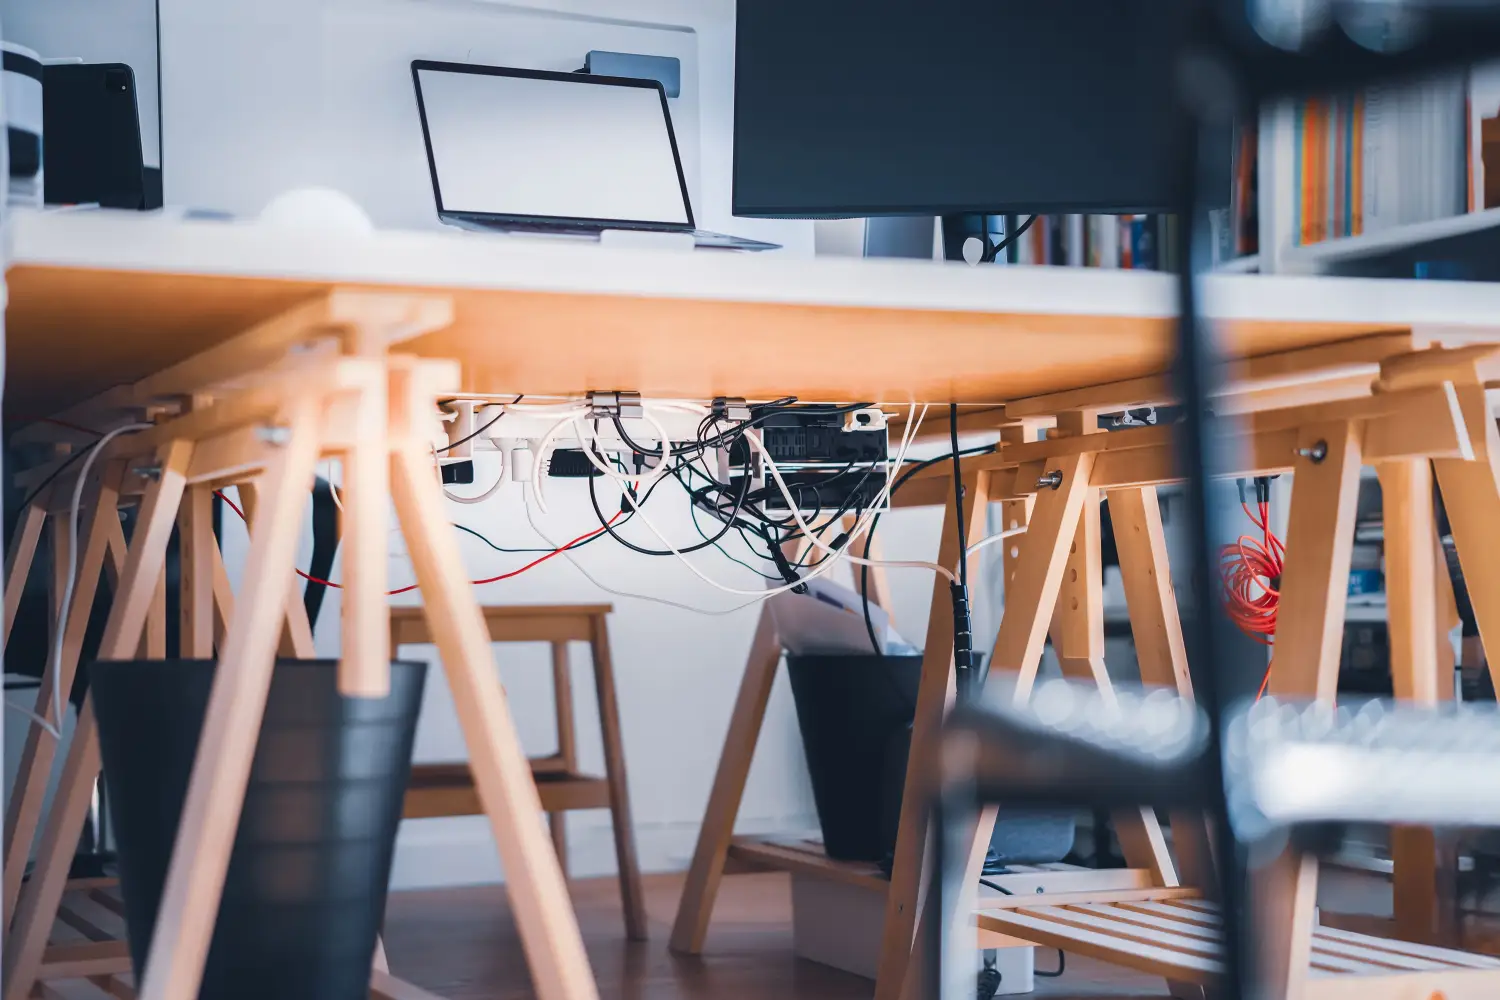
Most cable guides show you how to bundle wires after the desk is already against the wall. The floating, wire-free look you keep seeing comes from routing cables first—matching each device’s position to the nearest outlet, then hiding everything inside a low-profile raceway and an under-desk tray.
This method treats wires as part of the room’s layout, not a cleanup chore. Outlet locations and device positions set the routes; after that, you place the desk and shelves to agree with those lines. No visible wires touch the floor, nothing dangles behind monitors, and you never need built-in millwork to pull it off.
Quick Blueprint: Wire Routing in 5 Steps
- List every device that needs power or data, and mark its exact position on a floor plan.
- Locate each wall outlet you intend to use, then draw the shortest clean path from outlet to device.
- Choose your hardware: a paintable low-profile raceway for the wall run and a clamp-on under-desk tray or net for desk-level wiring.
- Route the cables along those lines before placing furniture; attach the raceway to the baseboard or wall, and mount the tray under the desk.
- Plug everything in, manage slack so no wire touches the floor, and test the setup at all desk heights if you use a standing desk.
Step-by-Step: Routing Cables Before You Arrange the Room
1. Map Every Device and Its Outlet First
Start with a complete list—computer, monitors, printer, lamp, phone charger, anything that plugs in. For each item, measure from the intended device spot to the nearest outlet using a tape measure. Note if the path crosses doors, windows, or foot traffic. If an outlet is more than about 10 feet away, either move the device closer or plan on a flat extension cord running behind a desk leg. For a standing desk in the middle of the room, pick an outlet on the facing wall and bring a power strip up into the tray with one riser cord.
2. Choose Low-Profile Raceway and Under-Desk Hardware
A slim adhesive channel—like a D-Line quarter-round or Wiremold flat-track profile—handles the wall portion. Get a paintable one so it matches the baseboard or wall later. Under the desk, use a clamp-on mesh tray that grabs the frame without screws or drilling. Make sure the tray is wide enough to hold a power strip plus cable loops. The whole setup should come off cleanly when you rearrange or move out.
3. Route Cables Before Placing Furniture
Install the raceway first: peel and stick it from the outlet up to the point behind the desk where cables will drop. Press firmly and let the adhesive set per the manufacturer’s instructions. Feed the power cord or extension cord through the channel. Attach the under-desk tray to the desk frame—if it’s a sit-stand desk, mount the tray to the moving section so it travels with the work surface. Put the power strip in the tray and connect the main feed.
Now slide the desk into position so the raceway entry sits behind it, hidden from view. Connect your monitor and peripheral cables, run them along the underside of the desk with self-adhesive clips, and coil extra length inside the tray. The result is a single vertical drop from the desk into the wall channel, with no cable touching the floor.
4. Float the Wires, Not the Desk
The raceway and tray together make the desk look like it has no power connection at all. Use small cable clips to keep monitor and peripheral cords tight against the underbelly. Route them into the tray from both sides. If a lamp or charger sits on the desk, feed its cord through a hole in the tray edge instead of letting it hang loose.
5. Final Testing and Trim
Power on everything to confirm it works. Raise and lower a sit-stand desk through its full range; watch for cords pulling tight or snagging. If you see tension, add slack inside the tray or swap in a longer cable. Trim the raceway to length with a hacksaw, snap on end caps, and paint it now if it doesn’t match the wall.
Signs Your Wiring Layout Will Hold Up
- Before you move a desk: A sketch shows the outlet-to-device distance for every powered piece, and the wall path for the raceway is clear.
- After raceway install: Cables sit inside the channel, ends are reachable, and no section lifts away from the wall.
- After tray mounting: The tray holds a power strip and all cords without sagging; when the desk is at standing height, cables have a gentle loop inside the tray, not a tight stretch.
- Final visual check: From any angle, the only wiring you might see is a slim painted channel along the baseboard. Under the desk, nothing hangs below the tray’s bottom edge.
Troubleshooting: When the Routing Plan Hits a Snag
Raceway Adhesion Fails on a Textured Wall
Self-adhesive channels pull away from plaster, brick, or heavy orange-peel drywall. Push the raceway back in place and drive small screws into drywall anchors every 12 inches. Paint the screw heads to match the channel, and the fix disappears.
Standing Desk Movement Snags Cables
If the desk strains a cord when it rises, the run is too short. Loop a longer power cord or monitor cable inside the tray so there’s always slack. For extra security, mount a flexible cable chain made for sit-stand desks—it guides the bundle smoothly through the motion.
Device Placement Too Far from an Outlet
When no outlet is close and you can’t rearrange the room, use a flat, low-profile extension cord rated for the total load. If it has to cross a walkway, run it inside a floor cord cover. Otherwise, cluster the far-away devices onto a single power strip mounted under the desk, fed by one longer heavy-duty cord.
Stray Wires Dangle Below the Desk
Cables can droop even inside a tray. Snap adhesive-backed clips along the underside of the desk to route every cord into the tray. For extra-long monitor cables, coil them in a figure-eight and secure with a velcro strap inside the tray—they won’t slip out.
Questions About Routing-First Cable Management
Can I run power cables inside the wall without an electrician?
Low-voltage data and monitor cables can go through a hollow wall with a feed-through kit and brush plates. Never run a standard power cord inside a wall cavity—it violates fire code. Keep power runs in surface raceway or extension cords inside a floor cover.
How do I hide cables on a glass desk that has no frame to clamp a tray onto?
Bundle the wires with a clear spiral wrap into a single transparent column and run it down one desk leg. Use clear adhesive clips on the glass to hold the bundle. If the desk has a crossbar or metal support below the glass, a clamp-on tray may still fit there.
What’s the best raceway solution for a rental apartment where I can’t drill?
Pick a self-adhesive, removable channel like D-Line or Legrand Wiremold. Both peel off cleanly when you move out—press them onto a smooth, dust-free wall for the strongest hold and avoid stretching the channel during installation.
Can I skip the tray and just tuck cables behind the desk?
You can, but gravity wins. Tucked cables eventually droop, tangle, and slip into view. A clamp-on tray costs little, attaches without tools, and keeps the desk perimeter clean with no ongoing maintenance.
Once the cables follow intentional lines and vanish into a slim raceway and under-desk tray, the office looks uncluttered. The next task is hiding the power strip itself—mount it inside the tray, or use a desk-mounted surge protector with a flat plug that sits flush against the wall channel.

Clara Bennett
After five years of transforming my 1920s bungalow room by room, I’ve refinished floors, hung blinds in bay windows, and spent more time choosing light bulbs than I’d like to admit. I learned paint sheens by painting my kitchen ceiling three times, and I found out the hard way that a rug too small makes a room feel unfinished. I believe every home can be both functional and beautiful, no matter the budget.
Related posts
Why Most Home Office Setups Fail—and the Order That Works
Most home offices fail because design comes first. Learn the measurement-based sequence that builds a workspace around your body and workflow, not furniture trends.

How Lighting Designers Layer Home Office Lights for Focus
Learn the commercial lighting tricks pros use for even face lighting on video calls and shadow-free paperwork—using the 3:1 contrast ratio and backward shadow analysis in your home office.

Struggling to Focus at Your Desk? The Right Wall Color Can Help
Learn how matte deep blue, satin pale green, and eggshell warm neutrals create focus zones for analytical work, video calls, and versatile office space—with color psychology to back it.
The Ergonomic Mistake That Will Cost You Years of Back Pain
Generic ergonomic rules ignore your body’s dimensions. Use knee clearance, elbow height, and eye level to set your desk and chair precisely—and stop back pain at its source.